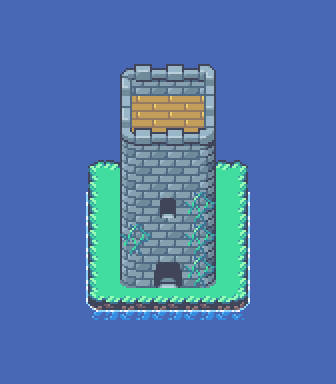
SDK in action
How it works?
Maps are built by providing tilesets using Paint-like api. Tileset is a collection of small images (tiles) that are used to construct larger, more complex visual scenes. If you are coming from game development field, this will feel like home.
Your tileset (256x256, tile size: 16x16)
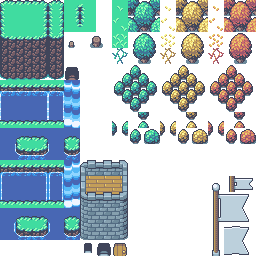
Each tile has an index (from top-left): 0,1,2,...,255
First, fetch WebAssembly module, then initialize canvas and load a tileset. After that, setup your map.
hashira.loadTileset("...");
hashira.setBackgroundColor("#4867b4");
hashira.addMap("island", 7, 8, 16, 16);
hashira.setCameraToMapCenter("island");
hashira.setCameraZoom(2);
Add first layer with island and set its Z position to 0.0.
Then configure layer data using tile indices. Note that 6 it's our
transparent tile.
hashira.addLayer("island", "grass", 0.0);
hashira.addLayerData("island", "grass", [
    [  6,   6,  6,  6,  6,   6,   6],
    [  6,   6,  6,  6,  6,   6,   6],
    [  6,   6,  6,  6,  6,   6,   6],
    [128,   0,  1,  1,  1,   2, 131],
    [ 98,  16, 17, 17, 17,  18,  96],
    [ 98,  16, 17, 17, 17,  18,  96],
    [ 98,  16, 17, 17, 17,  18,  96],
    [144, 145, 81, 81, 81, 146, 147],
]);
On top of the island, add another layer and set its Z position to higher number.
hashira.addLayer("island", "buildings", 1.0);
hashira.addLayerData("island", "buildings", [
    [6, 6, 165, 166, 167, 6, 6],
    [6, 6, 181, 182, 183, 6, 6],
    [6, 6, 197, 198, 199, 6, 6],
    [6, 6, 213, 214, 215, 6, 6],
    [6, 6, 213, 214, 215, 6, 6],
    [6, 6, 213, 214, 215, 6, 6],
    [6, 6, 229, 230, 231, 6, 6],
    [6, 6,   6,   6,   6, 6, 6],
]);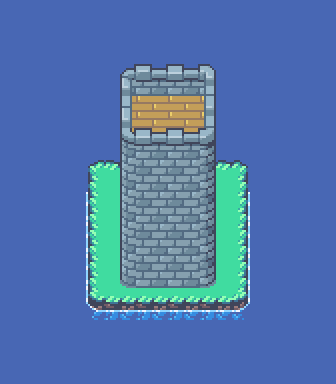
At the end add some final details on top of the tower.
hashira.addLayer("island", "details", 2.0);
hashira.addLayerData("island", "details", [
    [6, 6,  6,   6,  6, 6, 6],
    [6, 6,  6,   6,  6, 6, 6],
    [6, 6,  6,   6,  6, 6, 6],
    [6, 6,  6,   6,  6, 6, 6],
    [6, 6,  6, 245, 55, 6, 6],
    [6, 6, 55,   6, 55, 6, 6],
    [6, 6,  6, 246, 55, 6, 6],
    [6, 6,  6,   6,  6, 6, 6],
]);